Recording an acoustic ensemble of musicians it is rather different to tracking bands or solo musicians. Overdubs are infrequent but editing together multiple takes of the whole ensemble is common. Production Expert’s Audrey Martinovich shares some tips on how to run sessions and how to manage all those takes.
When recording an acoustic ensemble, it’s common for the musicians to be in the same performing space, for example, a string quartet is used to balancing dynamics together, tuning together, and making tempo adjustments together so we usually record them together, rather than overdubbing each player. Depending on the size of the group, recording this way also makes sense for time purposes. Are you going to overdub each instrument of a 72 piece orchestra? Probably not. Not only would it take forever, but the performance wouldn’t be as good. Unlike pop and rock, isolation isn’t really the goal with these groups because they play as one.
How Much Bleed Is Too Much?
No matter the setup, I always have a couple of pairs of different sounding room microphones, usually an XY pair and a pair of spaced omnis, and spot microphones that are positioned closer to each instrument to further control balance if needed.
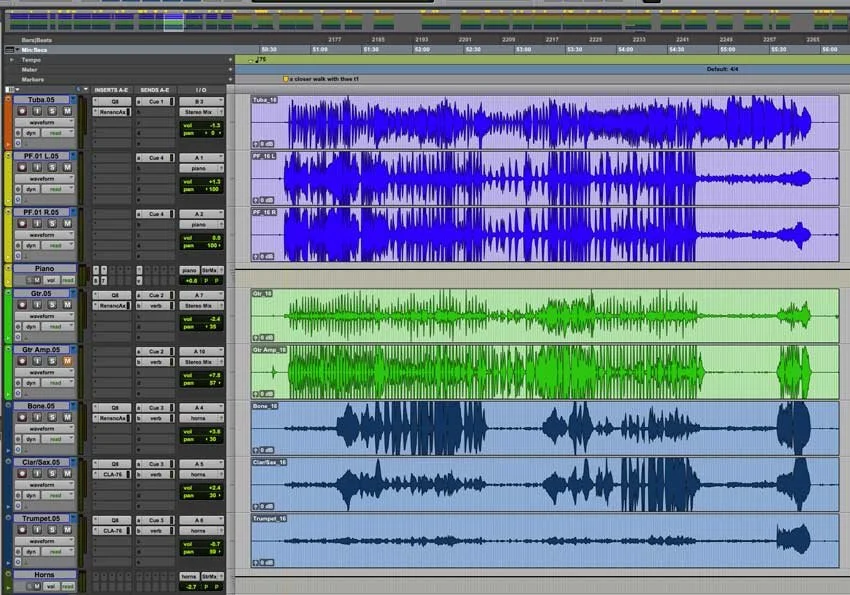
If you can clearly tell that your microphone is picking up what it’s meant to pick up in a way that sounds true to the instrument, the bleed shouldn’t be much of an issue in the mix. However, if you’re unsure if you’re listening to a trumpet or trombone mic, you need to adjust mic placement. Conversely, if you’re too close to the violin’s strings, for example, you’ll get a nasal tone that sounds unnatural for classical music. Check out the trumpet track in the following screenshot. Up until the very end, that waveform is all bleed and that’s ok, because our trumpet sounds like a trumpet when it’s time:
Chunk It Up
With classical music, it’s not uncommon to have a single song’s playtime be 15 or 20 minutes. As you can imagine, doing a couple takes of the whole piece would quickly tire out our musicians. Planning out smaller sections to record is helpful for the artist’s stamina because it allows them zero in on specific passages, but it’s also helpful for your editing.
Before recording, have the artist go through their piece and break it up into smaller chunks of about 20 measures or so depending on tempo and complexity. Sometimes there are natural breaks between sections such as rests, other times you’ll have to create your own break. If they’re having a hard time breaking up the piece, have them add breaks at strong downbeats or during a pizzicato section since it’s much easier to edit on a transient than on a sustained note. Editing on sustained notes is rarely transparent.
Take A Beat, Back Up, Repeat
I’ve worked with artists who will make a mistake in their recording, seamlessly circle back, and replay it, without any breaks. This can make it really hard to follow along and find where your edit points should be, especially if you’re not super experienced with following sheet music. Communicate with the artist ahead of time that when they mess up, they should Take A Beat (aka stop playing completely), Back Up to a couple measures before the mistake, then Repeat the passage. Communicate this strategy to the artist before the first take for a smooth session.
First, Record The Piece From Beginning To End
When practical, record a take of the tune from beginning to end. Treat the first take as a performance, meaning no stopping unless something goes seriously wrong. I usually tell the artists that this is a practice take but it is also a guide you can refer back to if you need it while editing. Sometimes it’s helpful to be able to listen to the piece in its entirety for context when you’re unsure of how a section is supposed to sound, and who knows, sometimes this take is actually usable!
Keeping Score
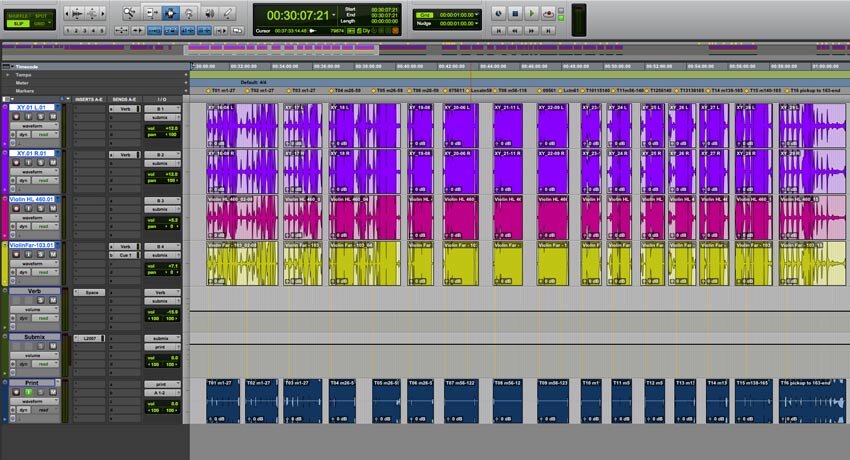
Ask for a copy of the score so you can follow along and mark measure numbers, codas, or other notes to yourself along the way. I usually just drop a marker in Pro Tools at these places, but you can also write the timecode directly on the score which is what I do for remote recordings when I’m using my JoeCo instead of my Pro Tools rig. With classical music there is rarely a click track involved (except for maybe a quick tempo reminder between takes) so rather than use playlists for the next takes, I let the recording run, keeping everything on the main playlist, so it looks like this when you’re done:
Recording The Chunks
Once you’ve got your “practice take” done, it’s time to start getting takes of the smaller chunks.
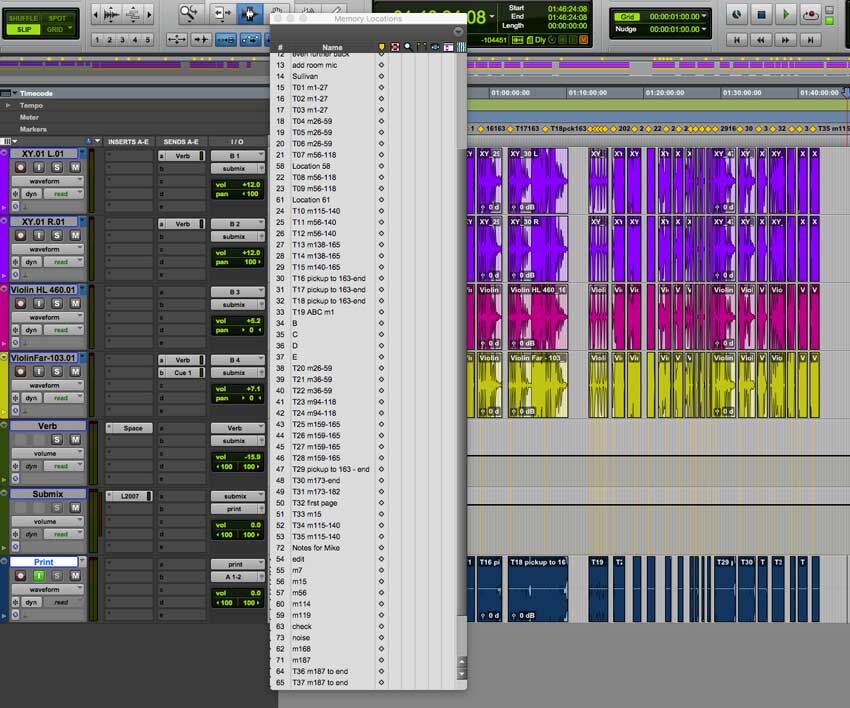
Although we have broken our piece up, we are actually going to record a few measures before and after each chunk to give us more material to work with in editing. Whenever you record a section, make sure you record some overlap into the previous and following sections. You might plan to edit at a certain spot only to realize the edit doesn’t quite work, and that making your edit half a measure earlier is more transparent. For example, if you’re zooming in on measures 25 - 45, have the artist play measures 20ish to 50ish. That being said, if the artist feels like they are nailing the section and they play beyond it, don’t stop them! Just note their actual stopping place, say, measure 60 instead of 50, so you don’t get confused later. It’s also common to do an ABC take of the first couple of measures, meaning we hit that section three or four times in a row in quick succession, to make sure the opening of the piece is really strong. I usually circle back around to this after we’ve gotten the rest of the piece down and note it as “Take X, A” then drop a marker at each restart, using letters to note the different performances. Check out markers #33-37:
Editing Notes
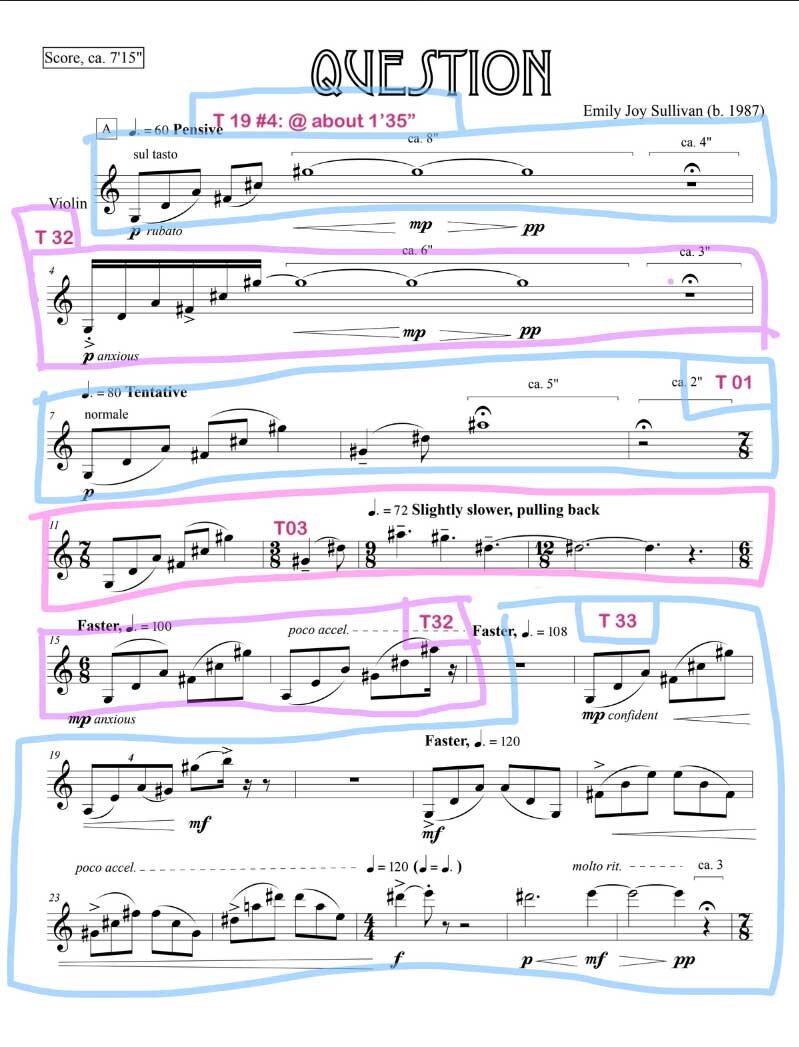
While I’m recording, I route all of my mics to a print track that I also record to create reference mixes in real time during the session. After the session, I rename the files on my print track as the appropriate take number, export the files, and give those to the artist or producer to review. The artist or producer will decide which take of each section is to be used and get notes back to me. Rather than get a list like “use Take 2 for measures 1 - 8, then go to take 5,” etc. I like to receive a marked up copy of the score with takes and timecode labeled. In the example below, you’ll see that for the opening measures, this violinist wanted to use Take 19, which was an ABC take, and use the 4th performance in that take.
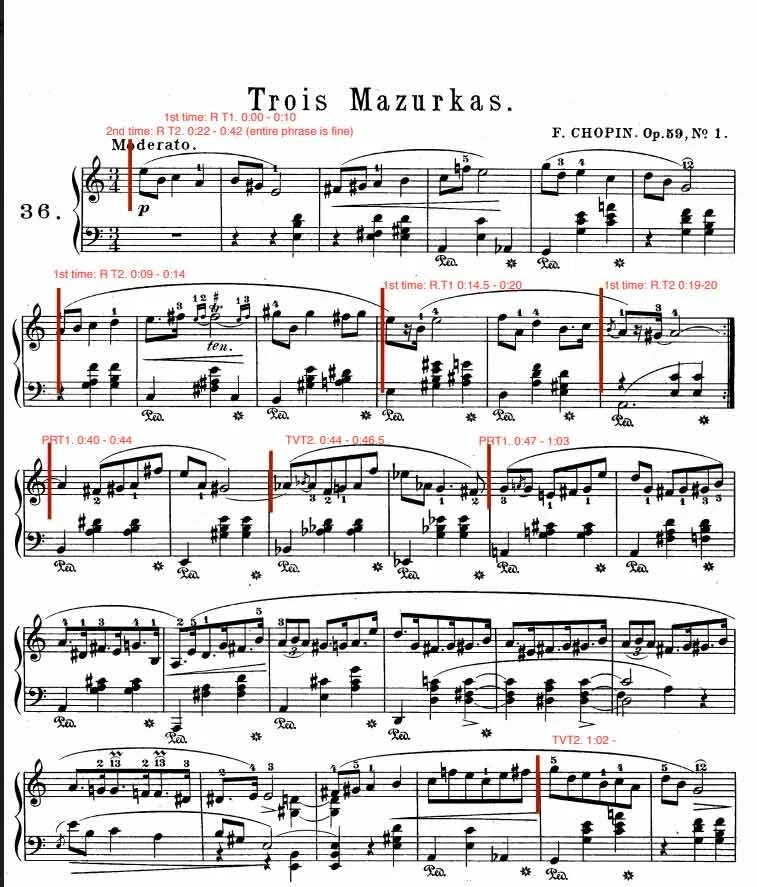
Why list the measures AND the timecode? Well, let’s say there’s a repeat in the score. The first and second repeat would technically have the same measure numbers, but if the artist likes the second repeat and wants to use it for the first repeat, noting timecode in the edit notes will help differentiate those two performances of the same section, such as in this piano score:
Putting the Puzzle Together
Whenever you’re working with a recording that has bleed, it’s important to keep in mind that if you adjust the timing of one note on one track, you have to do it across all of your tracks or you’ll hear some ghost notes, so keep your “All” group enabled while editing.
I start my edit by locating the first chunk that I need, copying it, and pasting it at the end of my session (copying and pasting my print track along with it) so it’s on my main playlist to the right of all the recordings. Then, I find the next batch of measures, and copy and paste that to the end of my edit and so on and so forth. It can be easy to lose track of where you left off editing in more complicated pieces, so copying your print track helps you to keep track of what takes you just pasted where since these clips will still be named after the takes. I also drop markers along the way, noting page or measure numbers.
When I’m making my edits, I always edit just before a transient. I find that leads to a more natural sounding edit. For example, lots of classical musicians will take a big breath before a downbeat. If I were to have to perform an edit at a spot like that, I would keep the breath from the previous section, and the actual note would be from the new take.
Here’s what a finished edit looks like:
It’s important to preserve the initial takes in case there are any edit changes later on. That way, you and the artist or producer will always be speaking the same language as far as timecode and take numbers go.
Other Things To Keep In Mind
Make sure the artist tunes frequently, more often than usual, especially if they’re a string player. It’s normal for tuning to slip a little as the instrument is played, but we don’t want tuning issues to be why a desired edit won’t work. If the artist wasn’t totally in tune for a certain note, that’s a different story than whole sections of a piece being slightly over or under pitch when we put our puzzle together.
Lastly, try to start and finish each piece in one recording session. If you have to stop before you’ve finished a piece and come back another day, take pictures of everything and mark on the floor with spike tape where your microphones were positioned and where the musician/s were standing. When you come back to this piece, do a short recording and A/B it with your previous recording to make sure you’re achieving the same exact sound. Do this BEFORE diving into the rest of the recording. You don’t want to have spent several hours recording only to find out you can’t use any of it in editing because the tone is so different from the previous day. Do a test recording and even a test edit if you have to, just make sure the new recording will be able to be seamlessly edited together with the previous material.