Zynaptiq Unveil has the power to reduce reverb in a mix. In this free expert tutorial, brought to you with the support of Zynaptiq, Mike Thornton shows how to reduce the reverb from a drum loop and a speech clip using a technique that is not in the Unveil manual.
What Is Unveil?
Zynaptiq Unveil is a plug-in designed to enable you to attenuate or boost the amount of reverb in a mixed-signal, even on mono sources. As a result of the technique Zynaptiq uses, Unveil can attenuate or boost other components that human perception regards as ‘background’ signals, like some types of ambience or what some people describe as ‘mud’ in music mixes.
Zynaptiq stresses that Unveil is not a gate/expander, transient shaper, or a denoiser-like FFT thresholding processor and that it does not use any phase cancellation or inter-channel correlation.
Instead, Unveil is based on Zynaptiq’a MAP de-mixing technology, whereby it separates foreground components from background components and enables you to process these separately.
Unveil has been designed to leave discrete echoes untouched. Feedback delay is often a relevant part of a composition, and should thus be considered as part of the signal rather than as reverb.
Unveil uses a process based on pattern recognition and perceptive modelling to determine perceptually relevant information within an audio stream. It assigns the detected patterns a significance based on their statistical properties and attenuates or boosts the parts that do not appear to contribute a significant amount of information to the signal.
Using a pattern recognition based algorithm that de-mixes the signal has the advantage of not requiring stereo information to determine room reflections from the signal. This means that it can be applied to mono and stereo, even surround channel configurations with equal ease and success. Also, since it does not use Fourier transform-based filtering, it does its magic with a minimum of side effects, keeping your signal crisp, clean and transparent.
As a result of this technique, Unveil can also be used for up-mixing, by separating the reverb of a recording and using the reverb for the rear channels, while using the de-reverberated signal for the front channels, and these two signals are exactly complementary as there are no phase-shift induced resonances, which you can get when using an EQ or some other up-mixing strategies.

What Can You Use Unveil For?
Unveil has a lot of uses, here are some of them:
Reduction of reverb on-location sound and dialog
Matching of reverb amounts and thus perceived distance on multiple location/dialog recordings
Reduction of reverb on sub-optimally miked musical recordings, or recordings from venues with less-than-ideal acoustic properties.
Up-Mixing by separating reverb and direct signal, and using these complementary signals for rear and front channels
Reducing or boosting “mud” or “grit” in a music mix to bring out the details or move the mix out of focus to make space for additional signals
Moving sounds/ambience in to or out of focus for On-Screen/Off-Screen differentiation
Moving background sounds further back to allow foreground sounds to stand out clearer
Creative sound design
Generating dynamic “states” from just one recording in game-audio.
How To Reduce Reverb Using Unveil From Zynaptiq
To get us going, in this tutorial, we are going to concentrate on reducing reverb, because once we can do that, then moving onto the other things Unveil can do is much easier.
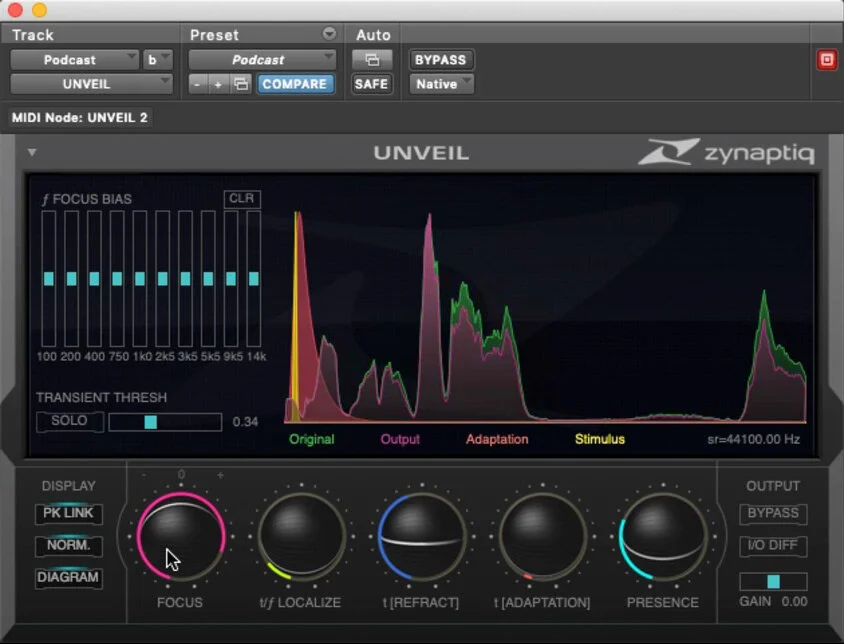
Let’s start by taking a look at the plugin. The first thing you will notice is that Unveil is not a ‘one-knob’ kind of a plugin and the second is that the control which adjusts the reverb/direct mix is called FOCUS. This control also affects the amount of unmasking the plugin performs. And thirdly, Unveil gives you full access to control the algorithm that is under the hood.
To reduce the reverb, you may want to start with the Default Unveil settings, which you do by clicking on a little grey triangle and selecting Factory Presets and Default down at the bottom.
Set the Focus control to maximum, set the transient threshold here all the way over to the right and then set Localize, Refract and Presence to a minimum.
Now start to play the audio and first off, adjust the Adaption control. Although technically not accurate, the best way to help you understand what the Adaption control is doing is to consider it as a release control.
Try to set this control by looking at the slope and shape of the original audio in green and adjust the Adaption control so that the orange section matches the shape and steepness of the decay of the audio. As you listen, if you are hearing the reverb come back in the gaps it’s too low, and if you hear parts of the wanted signal being removed, you have got the Adaption control too high. So, a combination of eyes and ears are good for optimising the Adaption control.
Unveil offers the option to automatically bypass very short transient signals to increase the punch and intelligibility. The fastest way to set this up is to enable the Transient Solo control. With the audio playing, adjust the Transient Threshold control until all you hear are short transients coming through. The trick is to let through the transients but not the early reflections. Once it’s set remember to turn off the Solo button.
Now we set about reducing the artifacts.
For this, we first turn to the Refract control. This is effectively determining how long the algorithm need to listen to the audio before it reacts, the analog analogy here is an attack control. Lower settings will mean that the algorithm is more sensitive to signals but the downside is that it may react to unwanted audio like noise and so the output may sound too artificial. Increasing the Refract control usually results in a better sounding de-reverberated sound but go too far and some of the reverb reflections may start to reappear.
Moving onto the Presence control, this adds a random signal into the algorithm. The effect on the audio signal tends to be a high-frequency boost and a more natural sound. The effectiveness of this control varies depending on the content, with speech benefiting more.
The last control we need to consider is Localize. The analogy for this control is the number of bands the signal is effectively split up into. Fewer bands mean less control and fewer artifacts but may cause pumping, whereas more bands mean more control but the potential of more artifacts. A good place to start is around the centre position and work from there.
However, sometimes this workflow still doesn’t deliver the best results. In that case, set the Focus control to its central position, where it is neither adding nor removing reverb and use the Focus Bias controls to home in on the problem frequencies. These enable you to adjust the FOCUS amount for each of ten frequency bands, to give a frequency selective amount of processing.
Remember that all of these controls do interact so you may end up re-tweaking them to get the best result.
You can also just dial back a bit on the Focus control, but we have found that backing it off a small amount can have a significant effect on the sound so small adjustments will be all you need.
There you have it, our advice on how to get the best out of Unveil from Zynaptiq. See you again soon.