

Levels
When recording into Pro Tools it is worth taking a little time to make sure you are recording at the optimum level ie a clean strong level that doesn’t clip.
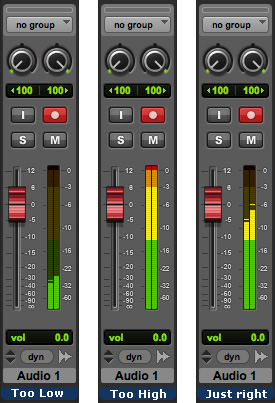
Too low
In the example above on the left hand channel strip the level is too low, as Pro Tools software doesn’t have any record level controls, the fader only acts as a monitor level control even though it turns red in record mode. On an HD rig you will need to adjust the level coming from your mixer or mic preamps. On some other hardware you will have record level controls on the interface that you can adjust.
Too high
In the middle example, the signal is too strong and is overloading Pro Tools and the Peak lights are on. In this case you would need to reduce the signal level into Pro Tools.
Just right for 16 bit recording
In the right hand example, the record level is just right, I sound like the Three Bears nursery rhyme!! You are ideally looking to have the Pro Tools meters in the lower part of the yellow section but leaving some headroom for the occasional unforeseen peak not to light the Peak lights and distort.
Just right for 24 bit recording
With 16 bit recordings you have 96dB dynamic range (the difference between the quietest sound you can capture and the loudest sound before you get distortion from clipping). In that context I would recommend working just into the yellow. However with 24 bit recordings you now have 144dB of dynamic range so you don’t need to record ‘as hot’ as you would with 16bit so you can leave some more breathing space, so record up to the top of the green would be the ‘just right’ for 24 bit recordings. As Dave Zimmerman says in the comments for 24 but recording “the yellow is the new red”.
With digital recording systems there is no latitude between clipped, distorted sound and clean undistorted sound. In the days of analogue tape the transition from clean to unacceptable distortion was a soft one. In fact driving the tape hard could in certain circumstances enhance the sound. So now we have plug-ins to recreate this effect to use on our ‘clean’ digital systems. But as we have no latitude in our digital world you need to make sure you leave enough headroom to cover the unexpected peaks without recording to low. After all you don’t want to be in the horrible position of telling your client that the superb take they have done is in the bin because it is distorted.
Name It!
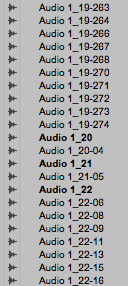
Certainly rename the tracks before you start a recording session as Pro Tools derives its default file names from the track name.
Otherwise you end up with a clip list full of Audio 1_01-152 etc.
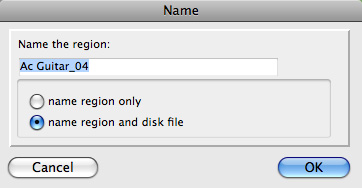
As soon as you have finished a take make sure you name the file. To rename a file double click it with the Grabber Tool either in the track or the Clip List and the standard rename window will come up. Always leave it to rename the clip and disk file so that the file in the Audio Files folder gets renamed as well. This will help you when you want to borrow files from another session.
Next time we are going to take a detailed look at the Smart Tool.