
In this article we revisit some of the basics of Pro Tools. All Pro Tools sessions are a combination of nine different track types. Some are self explanatory, others less so and some duplicate the functionality of other track types leaving you deciding which to choose and why. If you have questions we have answers.
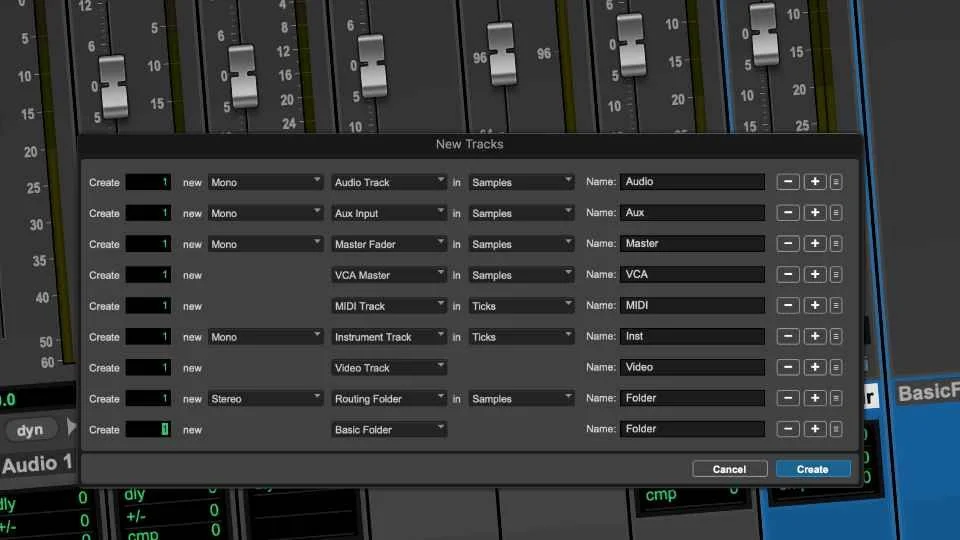
In Pro Tools there are nine track types.
Audio
Aux Input
Master
Midi
Instrument
Video
VCA
Basic Folder Track
Routing Folder Track
Of these, the ones a beginner needs to familiarise themselves with first are:
Audio Tracks
Instrument Tracks
Master Tracks
In this free tutorial video brought to you with the support of Avid, Julian explains the 9 different track types in Pro Tools and how you might use them.
Audio Tracks
Audio tracks are fairly self-explanatory. You can record to them directly or If you import audio into Pro Tools you will be given the choice to create new tracks for that audio to populate or to place it in the clips list for use later. One common question is whether it is possible to change audio tracks from mono to stereo and vice-versa - it is not, inserting some plug-ins will change the mixer channel to stereo but the track itself will still be mono.
You can mix and match different bit depths in a session but not different sample rates. You have the option to convert mis-matched sample rates. If audio is playing back at the wrong pitch or speed you might well have a sample rate problem.
Something you can do more easily that you used to be able to is to route to and from tracks of different channel widths. You used to have to manage this yourself but Pro Tools now does nearly all of it automatically - a big time saver if you work at channel widths greater than stereo.
Instrument Tracks
Instrument tracks are usually what a user needs if they wish to use MIDI. A common source of confusion is the existence of the MIDI track as well as the Instrument track. The inclusion of these is largely historical but for the novice, if you want to use MIDI in Pro Tools you probably want an Instrument Track.
A very common source of confusion for new users is the location of MIDI settings on newly created instrument tracks. By default these are hidden. Incorrect MIDI routing can be a cause of problems in MIDI sessions so you need to know where to look to find these. To view MIDI settings on Instrument Tracks in the Mix Window go to the view controls in the bottom left of the Mix Window and check “Instrument". In the Edit window look to the top left where you’ll find the track header show/hide controls.
Master Fader
A Master Fader should always be present in a Pro Tools session no matter how small. Its job is to monitor headroom on the output, without a master fader a track can be clipping its output and there would be no visual indication that this was happening. Master Faders have many other uses not least of which is providing insert slots for buss processors. Be aware that the insert slots are post fader in Master Faders, for other track types they are pre fader. Very often the fader is never touched but having that Master Fader meter is helpful and it should be present.
Auxiliary Input
Once you are familiar with these three, the next track type you’ll need is the Auxiliary Input. Using their analogue equivalents to explain the difference, if an audio track is a channel of a mixing console and a track on a tape machine, the Aux Input is just a mixer channel without a connected ‘tape track’. It can receive audio, process it and route it to other places but it doesn’t record audio or MIDI.
Aux Tracks are endlessly useful but the two uses I’ll refer to here are using them with sends to create effects send/return loops and using them as summing points to submix groups of tracks. Aux Inputs are awesome!
Things which you might be expecting to see which are not present in Pro Tools are a polarity or ‘phase’ switch and a stereo/mono button. These aren’t available but there are simple workarounds available to create the missing functions.
VCA Track
If you’ve used analogue mixers you might think that an Aux Input is the place you would go to control the levels of submixes of groups of tracks. This can be done but the next track type is probably more straightforward for controlling levels of collections of tracks. The VCA track, which used to be an Ultimate-only feature, controls the levels of mix groups.
The advantages of VCAs for these purposes are simplicity. A VCA is a master fader for a mix groups and behaves as a remote control for the channel faders assigned to it. Because of this it behaves independently of the audio routing set up on each track meaning that a track can be a member of multiple Mix groups controlled by multiple VCAs. Something which gets very complicated when dealing with submixes and Aux inputs.
MIDI Track
Largely superseded by the more recently introduced Instrument Track (though that was still a long time ago!), the MIDI track is still useful as a way to record and play back MIDI data without hosting a virtual instrument or any audio routing. Uses include incorporating external MIDI hardware into sessions and using them to send discrete MIDI streams to multitimbral Virtual Instruments. Another use I like them for is recording keyswitching for articulations and pattern changes on virtual instruments. Having them on a separate track to the actual notes really helps.
Basic Folder
Don’t be put off by the word basic. Basic Folder Tracks are tracks which are used to organise tracks in your session. They have nothing to do with where the audio comes from or goes to but in a big session they are incredibly useful.
By placing collections of tracks into a basic folder you can ‘unfolder’ the content with a single click to display them all in your session, and with a single click you can close the folder and put them away again. However things get much more interesting when you start to put folder inside folders. This way you can bring even the biggest sessions down to a manageable scale and quickly bring only the tracks you need to your screen. Add to this the ability to edit large groups of tracks from the top folder level and you have a real time saver.
Routing Folder
Routing Folders do everything a Basic Folder does and combines it with the functionality of an Auxiliary Input. Audio routing, plugin processing and level control are all covered and with the added workflow benefits of Folder Tracks, since they were introduced they have largely replaced Auxiliary Inputs in many people’s Sessions. Routing Folders are awesome!
Video Track
Lastly there is the Video Track. It plays videos. The Video engine has to be enabled in the Pro Tools preferences and the ‘o’ button brings the video track ‘online’ for playback. Working with video in Pro Tools is a big subject so I’ll leave that subject there and if you need more information there are many resources elsewhere on this site.
In this premium tutorial Julian goes further into Pro Tools Tracks by answering 5 key questions about them.
How Can I Watch This Video?
Firstly you can watch the preview section of this video for free, no charge and with no signup. If you have not yet signed up to the new platform, and you want to watch the rest of this video, and hundreds more like it, then you can by signing up for a free 7-day trial. If you aren't satisfied it is a good deal then cancel the subscription within the 7 day trial period and it won't cost you a penny. If you like it then for just $3.99 per month you can watch this and hundreds more videos like it.
If you are already an existing subscriber to our new video platform, then thank you for your support and you will be able to watch this video all the way through.
