

There are few things quite as satisfying in music production as successfully printing a fantastic guitar performance with a stellar sound to match. Whether you’re rocking a physical 4x12 or operating entirely in the box, these creative and technical pointers will help you sharpen up your axework.
1. Prepare Your Guitar
This might sound obvious but that doesn’t mean it doesn’t warrant putting in writing: prior to the start of any session, it’s essential that you make sure the guitar being recorded is fully fit for purpose. That means tightening up any loose screws that might be potential sources of buzzing or other unwanted noise, and at least cleaning the strings if not installing a completely fresh set of the highest possible quality and breaking them in a bit beforehand. Don’t skimp on cables, either – although you certainly don’t need to go for the most expensive wires in the shop, you should always opt for a reputable brand. And needless to say, your guitar also needs to be perfectly in tune.
2. Mic Up
A significant factor in any recorded guitar sound is the selection and positioning of the microphones used to capture the speaker cabinet or – with acoustic guitar – the instrument itself. By and large, dynamic mics such as the Shure SM57 and Sennheiser MD421 are the weapons of choice here for electric guitar, while the sensitivity of a good condenser is generally preferable for acoustic; but there are no hard and fast rules. When it comes to placement, take advantage of the proximity effect to tailor the low-end response: closer to the speaker cone or guitar for more bass, further away for less. Similarly, moving the mic around between the centre and edge of the cone, or between the between the edge of the soundhole and the 12th fret of your acoustic guitar, and adjusting the axis, will have an effect on the mid- and and high frequencies. Experiment.
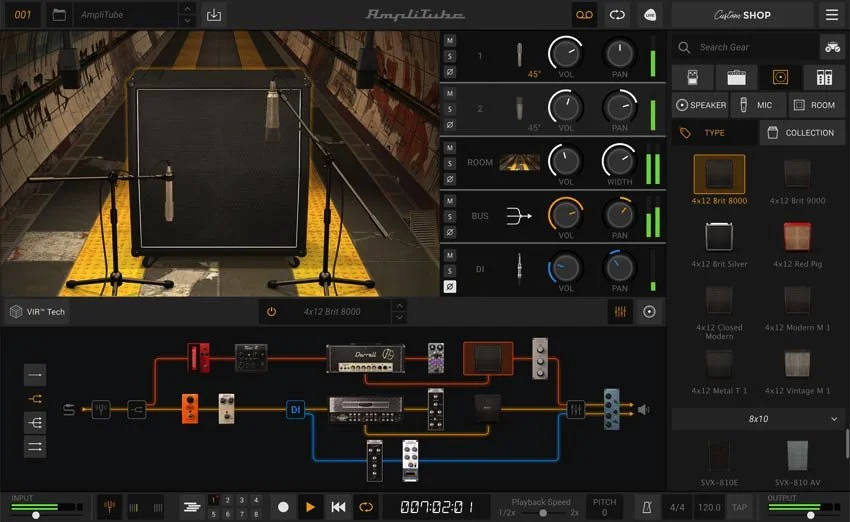
3. Amplification: Real Or Virtual?
With so many amazing amp simulation plugins on the market at a wide range of prices, today’s guitarist can elect to shape their tone 100% digitally if they so wish, getting into the virtual minutiae of everything from amp and cab selection, to microphone choice and positioning, to stompboxes and rack effects. Nonetheless, many guitarists and producers would argue that good old fashioned hardware amplification, captured through real mics in a real room, is still the better option if you have it, due to the authenticity of sound and response (there’s nothing quite like the feel and energy of a big cab in a great sounding space), and the elimination of latency, which we’ll come to shortly.
What can’t be disputed, however, is the convenience of software in terms of ‘form factor’, and the freedom it grants you to tweak or completely rework the guitar sound after the fact – with a clean signal recorded, you’re free to tweak or radically transform it entirely in-DAW to your heart’s content. Hardware, on the other hand, commits you to the recorded sound (although it could be suggested that the resulting inability to tinker with it endlessly at the mixing stage is actually a plus). On the flip side once again, though, software amp sims come with a sizeable caveat…

4. Minimising Latency
If you’re recording a guitar straight into your DAW in order to take advantage of plugin amp simulations and other effects, you’re going to have to to deal with the ever-present issue of latency. This is the time it takes for a signal entering the input of an audio interface to be processed by the DAW into which it feeds, then returned to the monitor outputs and heard back through the speakers or headphones. The resulting delay can have a highly detrimental effect on a guitarist’s performance, as the sound doesn’t come back at you ‘instantly’ when you strike the strings of the guitar, as it would through a hardware amplifier. Modern audio interfaces can achieve impressively low latencies at very small buffer sizes, but really, any amount can be problematic, so workarounds are needed.
Almost all audio interfaces feature some form of ‘direct monitoring’ system, whereby the input is passed directly to the output in parallel with the signal path to the host computer. This enables zero-latency monitoring, but precludes monitoring through plugins, as the signal you’re listening to doesn’t come via the DAW – it’s just the DI. An easy option if you can deal with the compromised vibe of an unamplified (ie, totally clean) and effects-free performance, then.
If you’re prepared to spend a bit of money in the pursuit of low-latency guitar tracking, Universal Audio’s Apollo range of audio interfaces is well worth checking out, their proprietary Unison technology enabling certain UAD plugins to be deployed on the interface inputs at near-zero latency, including Fender ’55 Tweed Deluxe and Marshall Legends Bundle.

5. Always Record The DI
Having discussed the relative pros and cons of real-world amplification and software simulations thereof, ultimately, we highly recommend drawing on both whenever possible, by recording your amped and DI signals to separate tracks at the same time. Your audio interface will feature both mic and instrument inputs, so you can use the first to record your amplified tone and the second to capture the DI signal from the amp. That way, if for any reason your carefully designed tone ends up falling short (perhaps the track changes stylistic direction slightly), you can call up the DI track (on its own or blended with the amped track) and either shape it using plugins or send it back out to your amp and effects chain for recording back in again.
In fact, this is also a good – if rather convoluted – way to beef up that uninspiring direct monitored signal when working around latency. Even if you don’t record it, the sound of the amped tone will get you into the performance far better than the raw DI.
Share your go-to guitar recording techniques in the comments.
Photos by Brett Sayles and Erik Mclean
