
In this article for Audient’s website, LA-based producer, artist and writer Paper Idol aka Matan KG details 5 different ways to get creative using software compressors.
If you asked a room full of audio engineer students what a compressor does, you’d probably get a wide range of responses. “It’s the thing that makes tracks louder!” one may claim. “It’s that plugin David Guetta uses to make his synths pump!” another might say. Is there a single answer? Technically speaking, compressors simply reduce the dynamic range of a signal. Depending on their settings and application, however, compressors can be incredibly useful in a variety of situations. For this tutorial, we’ll be using Ableton’s stock compressors, but any basic software compressor will do. Here are 5 common uses of compressors:
1. Make Things Quieter
There is a common misconception that compressors make signals louder. In fact, the circuitry of the compressor can only make signals quieter. With that in mind, compressors are great for taming tracks that are standing out in certain moments in your mix. Let’s say you have a synthesizer pad that’s really loud when each chord first comes in, but you like the volume of the decay of the chords. If you simply turn down the track, you will make both the loud attack and the decay quieter. With a bit of compression, on the other hand, you can reduce the volume of the synth only when it passes the volume threshold – and leave everything else at the same volume.

Figure 1: this compressor is reducing the gain of any signal above the volume threshold of -22.7 dB by a ratio of 3:1. Notice that the gain reduction (GR) meter is showing attenuation and that no additional makeup gain is added.
2. Make Things Louder
Remember when I said compressors don’t make signals louder? They don’t – but most compressors allow you to “make up” the gain you lost in compression with an output fader – this post-compression gain is appropriately known as makeup gain. Many software compressions even have an automatic makeup gain function, which automatically applies makeup gain in proportion with compression-induced gain reduction. By reducing the dynamic range of a signal and then boosting the volume, you’ve effectively made the quieter moments in the track louder. The overall effect is the signal will be perceived as louder.
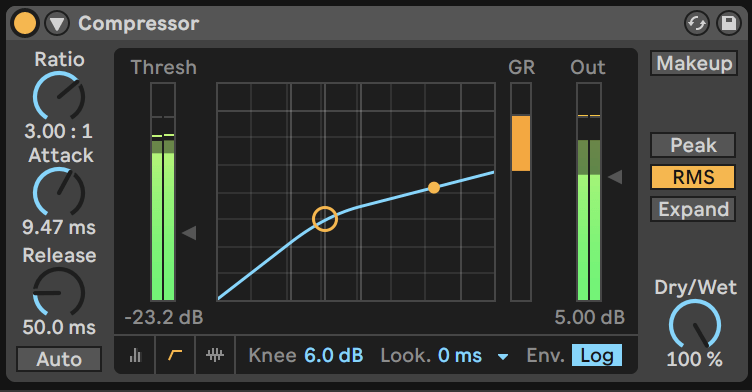
Figure 2: As in the last example, this compressor is reducing the output level of the signal… But not for long! Notice the output fader is up by 5dB. This post-compression gain boost will increase the perceived volume of the track.
3. Make Things Pump
Ah yes, the moment in the tutorial you’ve all been waiting for, where I teach you how to make the glorious (if not slightly obnoxious) sound of sidechain compression. Sidechain compression is an effect that’s been the secret sauce of dance music since the 90s and found its way into radio pop over the last decade. Here’s how it works: typically, a compressor uses the input of a signal to compress that same signal. With sidechain compression, an external sound is processed as the input signal, but the compression effect is still applied on the original signal. When the sidechain compressor is on a synth track, and the external signal is a kick, it ends up sounding like the synth pumps in and out between kick samples.
You may ask, why is this effect so popular? Sidechain compression mimics the effect of masking, in which one sound is so loud that other sounds are drowned out by its presence. Essentially, you can make your song sound like it’s blowing your speakers without causing any real damage. One of the best examples of this kind of sidechaining is “Warp 1.9” by the Bloody Beetroots.
Sidechain compression may also be used in a more subtle way – say, to reduce the volume of music in a radio show or podcast during the moments when the host is speaking, an effect known as “ducking.” In this scenario, the sidechain compressor would be placed on the music track, and the vocal would be used as the sidechain signal.

Figure 3: a basic side-chain compression setup. The kick track is being processed by the sidechain as the input signal for the compressor. Whenever the kick hits, gain reduction is applied to the synth, creating the pumping effect you hear in modern dance music. Use high ratios and low thresholds for the greatest effect.
4. Control Transients
Say you have a snare sample with a very loud transient at the start of it, and you want to attenuate just that transient. Try a compressor with a very fast attack and release times and bring the threshold down to reduce the volume of this transient. When the compressor is in “peak” mode, it’s using the actual peak of the signal as the input level. Because the attack is so fast, any of these peaks will be effectively “shaved off” in the process, and the compressor will return to its resting state quickly and keep the rest of the signal uncompressed. It’s very easy to totally squash the transient of a sound this way, so proceed with caution!
On the other hand, there may be situations where you want to increase the power of a sound’s transient, like on a flubby kick. You can add some “punch” to a sound by using longer attack times on a compressor (20-30 ms is a good place to start). This gives the transient of a sound time to escape before the compressor hits, such that when you add makeup gain the transients are louder and the rest of the sound should be around On the other hand, there may be situations where you want to increase the power of a sound’s transient, like on a flubby kick. You can add some “punch” to a sound by using longer attack times on a compressor (20-30 ms is a good place to start). This gives the transient of a sound time to escape before the compressor hits, such that when you add makeup gain the transients are louder and the rest of the sound should be around the same level as before.

Figure 4: The compressor on the left has a fast attack time and no makeup gain – this compressor will tame transients. The compressor on the right has a slow attack and makeup gain of 3 dB – this compressor will make the transient louder.
5. Glue Things Together
Have you ever double-tracked guitars or vocals, and noticed that one of the takes is popping out over the other? Compressors can help even out natural volume differences between those takes, or even glue a group of instruments together. It’s very common to put a compressor on the drum bus, as it creates a sense of cohesion among all the individual pieces of the drum kit. Dedicated bus compressors such as the Waves SSL Compressor or Ableton’s glue compressor are perfect for the job; the timing settings in these plugins work dynamically to ensure a smooth and gentle compression.
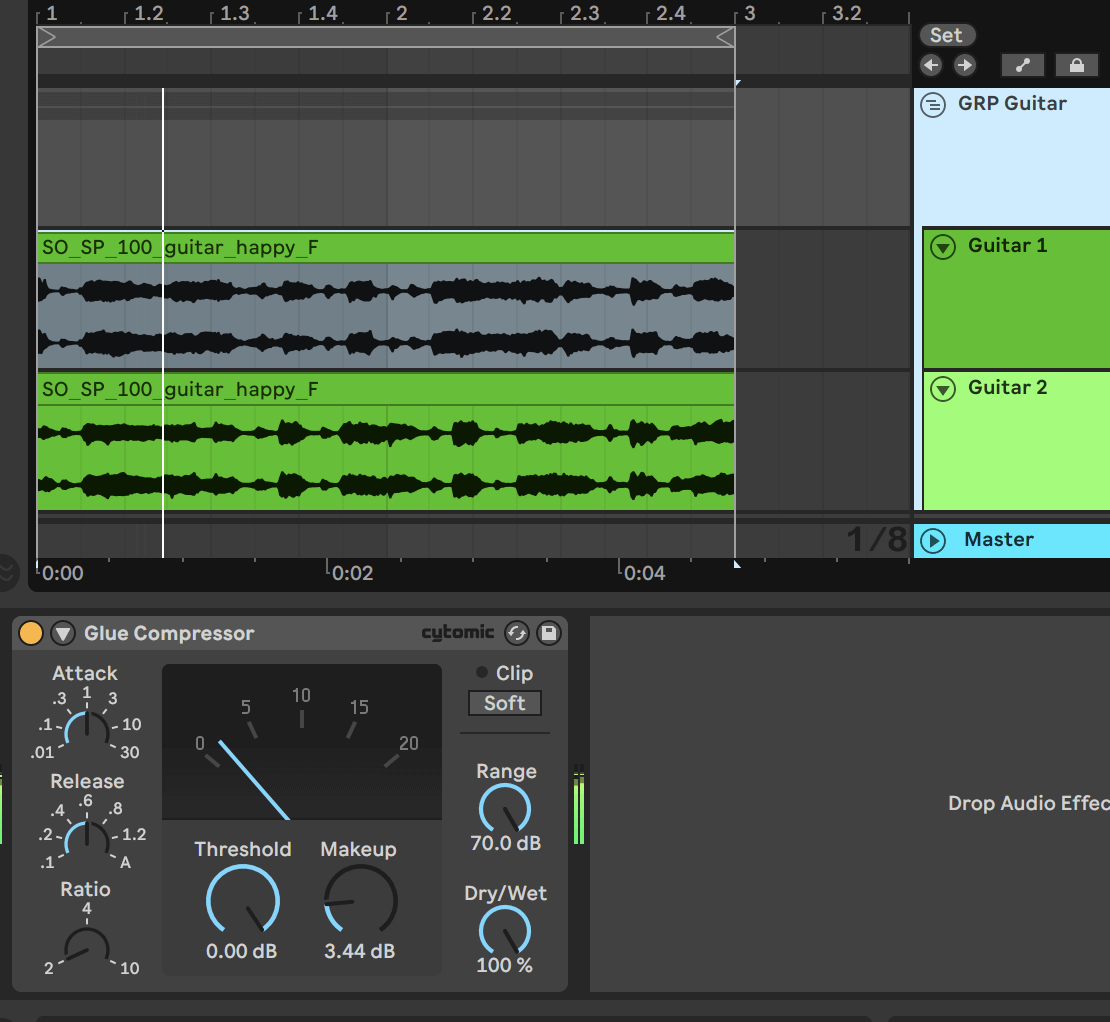
Figure 5: By dialling in a couple of dB’s of compression and adding some makeup gain, these two guitar tracks sound much tighter when played together. Play around with longer attack times to retain transients and try the automatic (A) release set for a gentle, dynamic release algorithm.