At the time of creating this article, the latest version of MacOS, named after the western desert, Mojave is due to be released out of it’s beta state and hit our upgrade boxes any day now. Whilst at present, no versions of Pro Tools are supported by Mojave, some of us Mac users (yes I still call myself one of those) will be fooled into upgrading. Some of us will wildly click YES to an on screen message just to get the box out of the way of that email we are writing (we have all done it). However, a time will come when we do actually choose to update to MacOS 10.14.x (Mojave), so here are some steps from Tom Nelson at the OWC Blog that you could take to make the path to MacOS enlightenment an easier one.
How To Get Ready For Mojave
The summer is drawing to a close, which means macOS Mojave is about to be released. It may also mean a few other things, but we’re going to concentrate on the release of Mojave and what you’ll need to do to your Mac to get it ready for the new operating system from Apple.
Mojave has a number of new features that you may be excited to try out, but it also has quite a few upgrades under the hood, which mean it’s especially important to ensure your Mac and its software are ready for macOS Mojave.
Upgrading To macOS Mojave
For this article, we’re going to concentrate on steps you should take to ensure your Mac is capable of running macOS Mojave, as well as make sure there are no hidden issues that could adversely impact installing or using the new operating system. We won’t be looking at the various ways you can install Mojave; we’ll cover that in the weeks ahead. So, let’s start by checking if your Mac is compatible.
Check Hardware Compatibility With macOS Mojave
The first step is to check to see if your Mac meets the minimum guidelines for running macOS Mojave. You can find details in OWC’s Complete List of Mojave Compatible Macs.
The main takeaway from the compatibility list is that Apple has dropped support for most Macs older than 2012. The main exception is 2010 and 2012 Mac Pro models that have Metal-capable graphics cards. The original graphics cards offered with the early Mac Pros weren’t Metal compatible, but it’s possible to upgrade the graphics card with a new Metal-compatible model.
Apple recommends the following Metal-compatible cards:
MSI Gaming Radeon RX 560
Sapphire Radeon PULSE RX 580
But there are a number of other graphics cards available that will work with your Mac Pro and support Metal:
AMD: Radeon HD 7000 and HD 8000, as well as the 200, 400 and 500 series of cards.
NVIDIA: Most GeForce 600, 700 and 800 series.
One issue you may encounter with a new Metal-capable graphics card is that it likely won’t contain a Mac-compatible boot ROM on the card. Without the boot ROM that supports the Mac, the graphics card won’t be initialized until after the Mac loads the graphics drivers. This can prevent boot up information from being displayed, including running firmware updates (should any become available) or using boot options that require any type of interaction.
To overcome the boot ROM issue, you can either attempt to locate a graphics card with an Apple boot ROM or keep the original graphics card installed and connected to a second monitor.
One last note on Metal graphics cards: AMD models come with Apple graphics drivers built in, while NVIDIA models do not. This means you’ll need to download and install the Mac graphics drivers from the NVIDIA website before the card will work correctly.
You may also need to update NVIDIA drivers before you upgrade to any new version of the macOS, such as Mojave.
Check Software Compatibility
All current software supplied by Apple is likely to work correctly with macOS Mojave, but some earlier apps from Apple may not be so lucky. Aperture 3, the last version of the popular photo management app, has mixed results with Mojave, with many users reporting it still runs with the Mojave beta. But there are also reports of issues with its use.
Final Cut Pro X, Motion, Compressor, Logic Pro X and MainStage will likely need to be upgraded to the latest version to ensure compatibility with Mojave.
Older versions of iWork, including Pages, Keynote and Numbers, will need to be updated to the current versions to ensure compatibility with Mojave.
32-bit Apps
Mojave is the last version of the macOS that will allow 32-bit apps to run, though when you first launch a 32-bit app you’ll see a message warning you that the app isn’t optimised for your Mac, and needs to be updated by its developer.
When you see the warning message, you can click the OK button and the app will launch. You should make a note of the app and check with the developer for a newer version.
Microsoft Office for Mac 2011 may continue to work with Mojave, but since Microsoft has already dropped support, they won’t be fixing any bugs that show up. It may be time to upgrade to a newer version of Office, or consider an alternate app as a replacement.
Adobe apps are mostly 64-bit, but there are some common libraries that were written with 32-bit code. Most CS 5 and later Adobe apps should still work under Mojave, but don’t be surprised to see issues pop up. If an Adobe app is a critical element of your workflow, you should consider upgrading to the latest version.
For the short run, your 32-bit apps will likely still work with Mojave, but you should be actively planning on upgrading or replacing these older apps.

You can use System Report, part of About This Mac, to see if your apps are 32-bit or 64-bit.
Backup
If your Mac is compatible and you decide to proceed with an install of macOS Mojave, (remember Pro Tools is still not approved, so think carefully before you do this) the first step you’ll need to take is to back up your Mac. Ideally, you will have both a current Time Machine backup of your data as well as a current clone of your Mac’s startup drive.
For those of you with important data on external drives, such as music libraries, video libraries, photo libraries or any other type of data, you may want to have a backup of these as well. Backing up your libraries can protect you, should a Mojave app need to perform an upgrade to a library format and something goes wrong during the upgrade process.
Having a pre-Mojave copy of your media libraries could also allow you to more easily downgrade from Mojave, should the need occur.
How Much Space Does Mojave Need?
Apple hasn’t actually set a minimum space requirement yet, though I’m sure they will once the beta is wrapped up. At the moment, it looks like 20GB would be more than enough space for a clean install of just the Mojave operating system and the standard apps that Apple includes.
Of course, having more free space is better, and one of the tasks you should undertake before upgrading to any new version of the Mac OS is to clean up your storage space to get rid of files you no longer need and free up additional space.
The guide Tech 101: How to Quickly Free Up Mac Storage Space will help you free up space on your Mac.
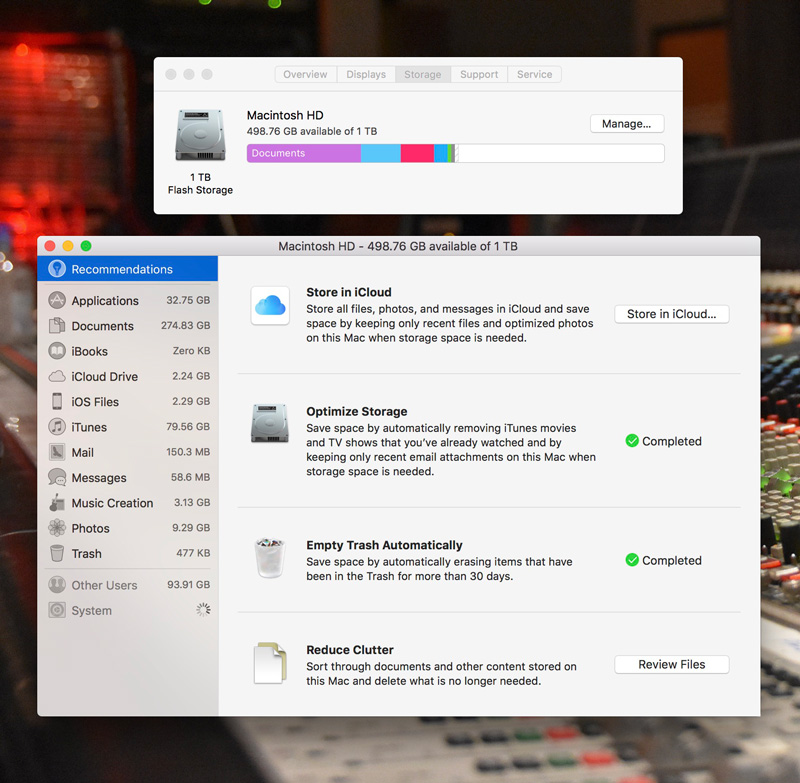
You can use the Storage tab in the About This Mac window to both display how space on your drive is used and assist you in managing your storage space.
Check Your Drives For Errors
One of the leading causes of installation failure is a startup drive — or the drive that is the target for the install — being “wonky.” In this context, “wonky” means the drive has one or more errors, failures or bad data locations. In day-to-day use, these hopefully minor errors won’t cause issues since they may be repaired on the fly, or just not encountered, because you have no data currently stored in a bad area.
But when you’re installing a new OS, there’s a lot of data being read from and written to your Mac’s storage system. To help ensure no errors are encountered during the install, it’s a good idea to use Disk Utility’s First Aid feature to verify and repair any issues your drive may have. You can also use third-party disk repair tools if you prefer; the important takeaway is to make sure your storage system is in good shape before you install macOS Mojave.
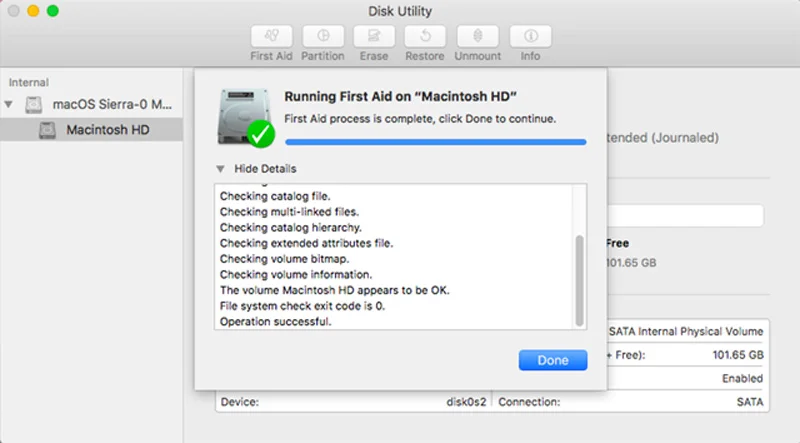
First Aid, part of the Disk Utility app, can be used to check for drive errors and issues.
APFS
APFS is now supported on Fusion drives with macOS Mojave, which will update any internal drive, SSD, Fusion or standard drive to the newer APFS system as part of the installation. In macOS High Sierra, you could force the installer not to use APFS with the use of a Terminal trick. The macOS Mojave installer no longer supports the non-APFS install option.
This means the drive you’re using for the Mojave install will be converted to the APFS format. Other physical drives you have connected to your Mac should not be affected by the APFS upgrade, although you may be able to convert additional drives to APFS, if you wish.
Boot Camp
If your startup drive includes a Boot Camp partition, the installation of macOS Mojave should leave your Windows partition alone, allowing you to continue to boot into Windows whenever you need to.
If this is your first time working with APFS, there is one issue with Windows of which you should be aware. Windows isn’t able to see APFS formatted drives, making sharing data between APFS formatted volumes and Windows difficult. You can get around this issue by creating an HFS+ volume on a drive that both the macOS and Windows can see.
Another minor issue with APFS and Boot Camp tends to crop up when you need to restart from Windows to the macOS. Since Windows can’t see your APFS formatted startup drive, you won’t be able to select macOS as the volume from which to start. The work-around is to restart the Mac while holding down the Alt key and then select the macOS volume from the Apple boot manager.
Ready To Install
Once you’ve completed all the cautionary tips outlined above, you’re ready to download and install macOS Mojave from the Mac App Store.
If along the way to the promised land of Mojave you find a bump or two in the upgrade road please do let us know in the comments section below and if we can we will do our best to help you at this challenging time.
This article is not sponsored content but Other World Computing (OWC) are a Production Expert partner brand.